

How To Create Voice Chat In Discord
Note: This post is not part of The Beginner's Guide to Steemit, but the material covered here may be implemented into the guide at some point. I'm sharing this now because it is relevant to our recent activities in @thesteemengine Discord group.
In this guide, I'll show you how to prepare yourself to participate in voice channels on various Discord servers! Let's get started!
Building community and engaging other users on Steemit is one of the best ways to get to know other users, build a following, and ultimately increase earnings on posts.
There are many ways to engage other users. I often suggest leaving meaningful comments on other users' posts as a great first step when new users join the platform.
While comments allow a sense of communication with other users, Steemit has not implemented an official instant messaging platform. Therefore, communities have moved to Discord servers in order to have a home for conversations among its members.
These servers offer an excellent place for users to communicate with each other in text channels, but recently, voice-driven efforts have developed across Steemit, which allow users to interact using Discord's voice chat features.
Preparing Yourself for Voice Sessions
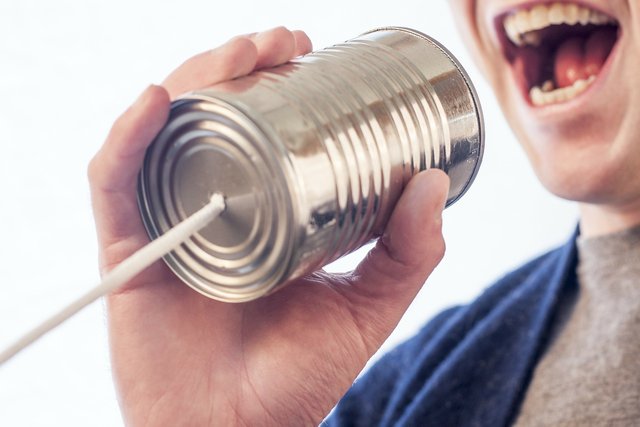
Image created by RyanMcGuire. Used under a CC0 1.0 Universal License.
With more and more voice-based curation segments popping up, I've received a variety of questions and made many observations about the best ways to prepare yourself to interact with other users on one of these segments. This post will seek to prepare you for participating in voice sessions on Discord!
Here's what I'll be covering:
- A Brief Intro to Discord
- What you need to participate in a voice chat session
- How to download and install Discord
- Checking your settings (push-to-talk and more)
- Joining a voice server
- Participation Etiquette
- Tips & Suggestions
So What is Discord?
The Discord logo is a trademark of DiscordApp.com Usage information here.
Discord is a text and voice chat software platform that allows easy communication among members of communities. Originally designed for gaming communities, Discord allows the creation of servers, which are customizable based on the community.
For example, @thesteemengine has a Discord server where members may interact and submit their posts for consideration by other members. Our curation team uses the submissions in the server to decide what appears in each day's Daily Whistle Stop, and I use the server to decide what posts to include in each of my STEEM Engine Express podcasts.
Discord is organized first into servers. Many groups on Steemit have active Discord servers, including @thesteemengine, @thewritersblock, @minnowsupport, and @youarehope.
Joining a Server
A person may join a Discord server by following an invitation link sent by another member of the server.
Once in a server, you'll see various channels, designated with # symbols. Click on the various channels to browse through and type responses.
Voice channels in a Discord server look different than text channels. You'll notice a small sound icon beside a voice channel.
Similar to how you join a text channel, simply click on a voice channel to join it. But before you're ready to chat, there are several things you'll need to do.
What You Need for Voice Chat
In order to make the most of joining a voice chat session on Discord, you'll need three things: a microphone, a listening medium, and a stable Internet connection. We'll talk about listening first, since everyone can listen to a session without talking in the session.
Speakers or Headphones?
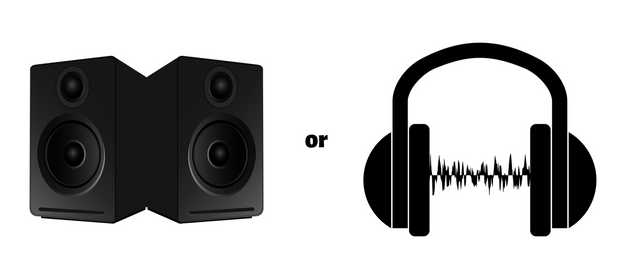
Image created by @ethandsmith using resources created by GDJ and redhead_pueppi. Used under a CC0 1.0 Universal License.
Discord can run as a software program on your computer, an app in your browser, or as an app on your mobile device. All of these devices generally have some sort of speakers attached, allowing you to listen to music, videos, and other sorts of sounds.
Regardless of whether you want to participate in a session by talking, anyone can join a Discord voice channel just to listen. The speakers on your computer or mobile device will work fine for this purpose.
Generally, using headphones or earphones is a better choice when participating or listening to a voice session. Since users have a variety of connection speeds, microphones, and system settings, the volume levels may vary based on who is talking. Other users' voices may be more easily heard when you're using headphones.
Using headphones also eliminates the likelihood of feedback occurrences. Feedback happens when a microphone picks up the signal from speakers and feeds the sound back into the system. This may cause loud screeching sounds or other unpleasant sounds, so if you're planning to talk on the channel, definitely grab a set of headphones or earphones.
Microphones
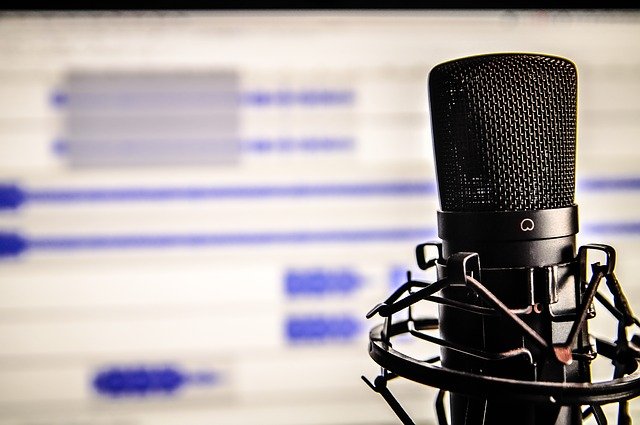
Image created by TheAngryTeddy. Used under a CC0 1.0 Universal License.
If you are planning to talk on a voice session, you'll want to have a great microphone!
Built-In Microphone or External Microphone?
If you're using Discord on your computer, most modern PCs or Macs have microphones built in. However, this may not be your best choice when it comes to participating in a voice session. These microphones are often low quality, which means other participants may have a hard time hearing you or you may experience interruptions when trying to speak.
The alternative to this is to use an external microphone or headset. These have become relatively inexpensive in the last few years, so you can purchase one from your preferred retailer.
Use Your Mobile Phone's Microphone
External microphones are definitely your best option, but if you don't have one or can't get one, you might be able to get better sound quality by using your mobile phone. The built-in microphones on mobile phones are generally better quality than those in computers, so you can download the Discord app for your phone!
Some sets of earphones included with mobile phones also have a microphone. These microphones are also a good alternative to your built-in microphone on your mobile, and may even work as a microphone on some newer computers.
Give all of these options a try if you can. If you aren't able to get a USB microphone, you can probably make do with your computer's built-in mic, so don't let it discourage you from participating!
Internet Connection

Image created by TheDigitalArtist. Used under a CC0 1.0 Universal License.
You may notice that the quality of other users' voices varies. While some people have higher quality microphones, the quality of your voice also depends on your Internet connection.
The key aspect of your connection is that it needs to be reliable and stable. Many areas of the world do not have access to high speed connections, but Discord does a decent job of converting the bit rate (the quality of the audio) based on your Internet speed.
Before each voice session that you participate in, make sure you are connected to the Internet and that the connection is stable. If you're on wireless and you have the option to connect a LAN cable, you may want to do so.
You can see the quality of your connection on Discord in the lower left corner once you're connected to voice. If it turns yellow or red, you may want to check your connection.
If you still experience connection issues, your bandwidth might be too low. Consider heading to a coffee shop or local library to participate since these locations may have faster Internet speeds than your home. You may also consider using your data connection via your mobile phone to participate.
There are many options. If you live near a university, get close to the campus and see if they have guest Internet access. These connections will be very fast and reliable, which will be great for participation in a voice chat session.
Download and Install Discord
Discord is a very versatile app as previously mentioned. While it can be run in a browser window, if you plan to participate in a voice chat session, you'll want to download the Discord client to your computer so that you don't have to worry about being in the correct window in your browser to participate.
Installing Discord is simple. Head to https://discordapp.com and select your operating system! Discord is available for Windows, Linux, and Mac, and has apps for Android and iOS.
Proceed through the installation normally, and then launch the program. Once you've logged in, you'll see all of your channels available just like you would when logged into a Discord browser window.
Checking Your Settings
Image created by ProSmile. Used under a CC0 1.0 Universal License.
The next thing to do is get your headphones, microphone, and any other accessories you plan to use and plug them into your computer.
Discord has a settings menu that may be changed based on your personal configuration. Among these are the Voice & Video settings, which will define how you listen and talk when connected to a voice server.
To access these settings, open Discord and look in the bottom left corner. Beside your name, you'll see three buttons. A microphone icon, a headphones icon, and a settings wheel.
Click on the settings wheel to access Discord settings. You'll be greeted with a page that looks like this:
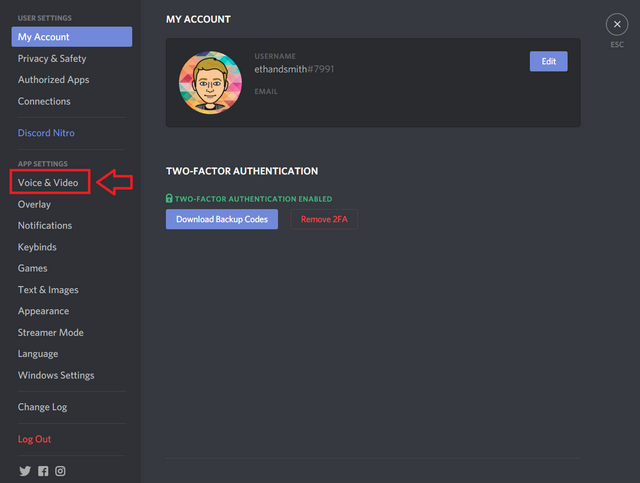
Feel free to look around at these settings, especially the ones that allow you to set up two-factor authentication for your account. Then select "Voice & Video." You'll see this:
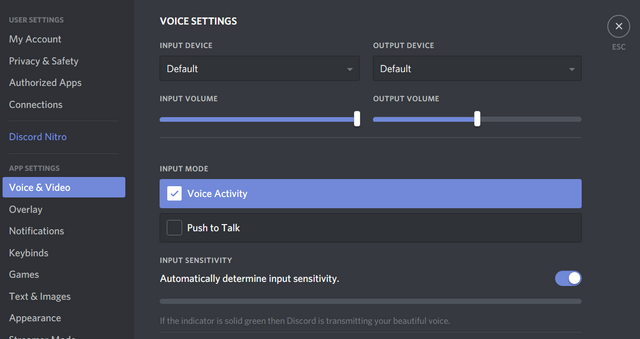
Here's where you can make some changes to ensure that your voice chat session goes as smoothly as possible.
Input Device Settings
First, under Voice Settings, you'll see "Input Device." Click the drop-down box to select the microphone you want to use. You may see multiple devices if you've plugged in a USB microphone, so be sure to choose the correct one.
If you're unsure, you can check your computer audio settings. In Windows, press the Windows key and type "manage audio devices." Select the first option that appears and you'll see a list of all of the audio devices you presently have attached to your PC. This process should be similar in Linux and on Mac OS.
Output Device Settings
Next, under "Output Device," select the speakers you want to use. If you're using headphones that plug in with a traditional 3.5mm jack, generally this will not need to be changed. However, if you want to use a USB device, be sure to select it on this menu.
Push-to-Talk
The push-to-talk feature of Discord is what makes voice chat sessions truly great. By default, Discord will turn on your microphone whenever it sense noise. However, this may be other noises besides your voice. This means unwanted noises can often interrupt voice chat sessions. The way to avoid this is to set up a push-to-talk key.
Enabling push-to-talk means that you must press a specific key (or combination of keys) on your keyboard in order to enable your microphone and speak.
This prevents unwanted noises from entering the session. It's easy to set up. Underneath the Input and Output device settings, you'll see a section called "Input Mode," and beneath it, two options: Voice activity or Push-to-Talk. Select "Push-to-Talk."
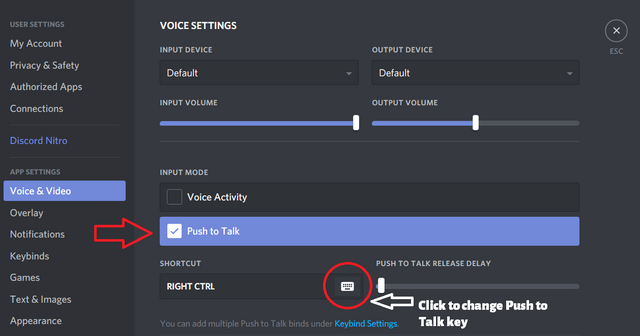
Now you'll need to set a key to act as your Push-to-Talk key, i.e. you need to assign a key that when you press it, your microphone turns on. Simply click on the box beneath where you just selected "Push-to-Talk" to "Edit Keybind," which simply means you'll be able to select a new key for your push-to-talk key.
Once you've clicked "Edit Keybind," the box will turn red and you'll see a button that says, "Stop Recording" appear.
Don't worry, you aren't recording anything through your microphone. Discord is recording the keys you press on your keyboard. Simply press the key you'd like to use as your push-to-talk key, and you'll see that key (or combination of keys if you choose) appear in the box. Click "Stop Recording" if you want to cancel the action.
Now you are set up to talk when you press the key that appears in the box. In the image above, you'll see that I've chosen the Right CTRL key as my push-to-talk trigger key.
Joining and Leaving a Voice Channel
Now that you've checked your input and output settings and assigned a push-to-talk key, you're ready to head into a voice channel!
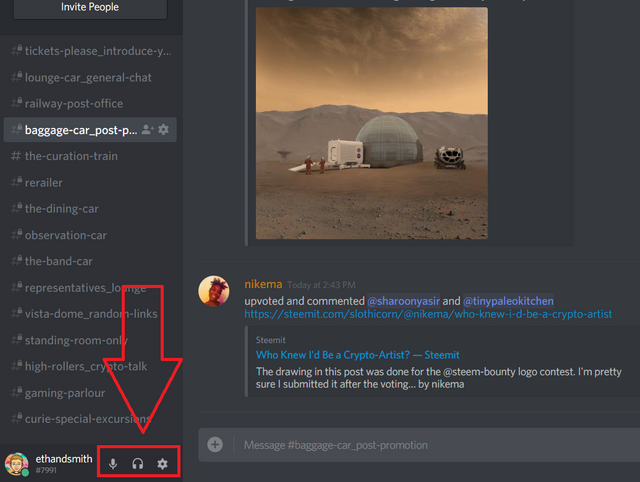
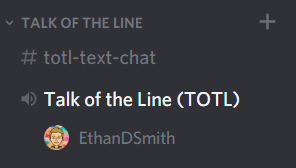
Head to your favorite Discord server and find a voice channel indicated by the small speaker icon. Here's an example from @thesteemengine server:
Once you've joined, your username will appear below the voice server in a list of other attendees who are present in the voice server.
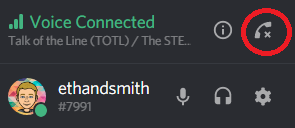
You'll also notice another status bar that appears in the lower left that shows you your connection quality and connection status:
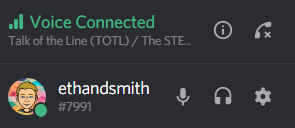
If the word "Connected" appears green, your connection is stable and great for the voice server. Keep an eye on it if it turns yellow or red. This means your connection is weak and you may not be able to hear or speak properly.
Once you've joined, check to make sure your microphone is unmuted and your speakers are also unmuted. These settings may be toggled via the microphone and speaker buttons in the control panel beside where you clicked on the settings wheel earlier:
Small red slashes will appear on the icons if you are muted or deafened. They look like this:

Recall what your Push-to-talk key is, and prepare to participate!
When you're ready to leave the channel, simply click the "hang up" button in the lower left of Discord:
Participation Etiquette
Image created by geralt. Used under a CC0 1.0 Universal License.
Now that you've joined a voice room and unmuted yourself, you're ready to participate!
Depending on the session you're attending, you'll need to pay attention to how a session operates. Take a look in the description of the channel as well as the pinned messages to see if there is a list of rules or other participation requirements before you dive right in.
You may also want to see if there is a specific text channel for participants of the voice session. Rules may also be pinned in this channel.
As a general rule, you won't know whether your microphone is working until you try it. This might be difficult if you're joining a session that has been going on for a while.
If you're joining a session that starts at a specific time, consider arriving early and asking the host if you may test your microphone. Hold down the push-to-talk button and perhaps ask, "Can everyone hear me?" You'll find out very quickly whether you can be heard.
With your microphone checked, you are ready to participate. Be sure to follow the rules and try not to interrupt other speakers.
Note: Some rooms allow you to listen only, so you'll be muted by default once you enter. Keep this in mind in case you see the red slash through your microphone and you did not toggle the setting.
Tips and Suggestions
Image created by geralt. Used under a CC0 1.0 Universal License.
Troubleshooting
Occasionally, you'll join a voice chat room and no one can hear you, even if everything seems to be working. If this occurs, simply exit the room and re-enter. If that doesn't solve the problem, completely close out of Discord and re-open the program.
If all else fails, ask other voice channel participants. They're often very helpful in getting issues resolved.
Volume Adjustments
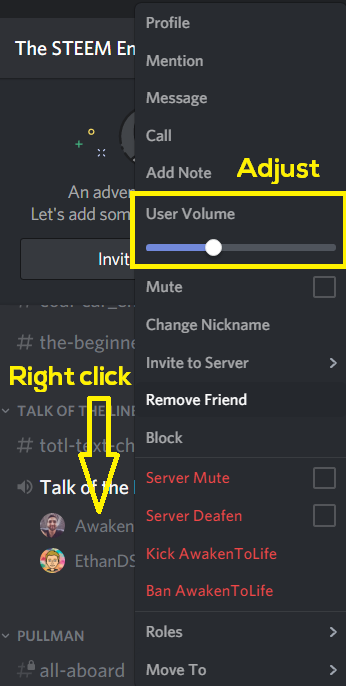
If you're having trouble hearing another user or they are just too loud compared to everyone else, you may adjust an individual user's volume by finding their name in the participant list and right clicking. You'll see a volume slider that you may adjust based on if they are too soft or too loud.
Sometimes this will still not help, so you may want to contact the user to let them know they are too soft or too loud.
You'll also notice many other options on the menu when you right-click another user's name. If you are the server owner or have elevated permissions, you will also see options to mute, deafen, kick, and ban users.
If other users tell you that your voice is too loud or too soft, you may adjust the input and output volume sliders in the Voice & Video settings menu discussed earlier!
Examples of Great Voice Chat Sessions
Some examples of groups which host frequent voice channel segments are:
The Steemit Ramble
Hosted by @ShadowsPub, Pimp Your Post Thursday features two segments where anyone may jump into the voice channel and "Pimp Your Post," i.e. tell everyone about your latest blog! This is a segment I have personally attended many times, and it's always enjoyable to sit back and listen to what other Steemians have going on. More information here.
Voices of the Underground
This channel, created by @beanz features weekly podcast sessions where users discuss various issues. The segments also feature guests and may be attended by any members of the server. More information here.
YouAreHope (SteemStar Network)
Steemit witness @sircork hosts a variety of voice curation segments on the SteemStar Radio network, including shows about a variety of topics where users may come on and talk. More information here.
The STEEM Engine
Recently, I even became involved in a live curation show using Discord's voice chat. It's called Talk of the Line, and we invite our members to come on the show and talk about their most recent blogs! It's been great to hear members come on voice to describe their posts and comment on others' blogs.
Final Thoughts
Voice chatting in Discord communities is a great way to get to know other Steemians on a more personal level. Hearing someone talk about their blog post can bring it to life in new ways.
I encourage you to find a group that hosts regular voice sessions and get involved. If you aren't comfortable presenting, just listen in and chat in text as you normally would. I've met some fantastic people via voice chat sessions, so I hope you will, too.
Please feel free to ask questions if you have them. I'd be happy to help get you set up on Discord voice!


How To Create Voice Chat In Discord
Source: https://steemit.com/discord/@ethandsmith/how-to-participate-in-discord-voice-channels-a-step-by-step-guide
Posted by: grangerficulaiders.blogspot.com
0 Response to "How To Create Voice Chat In Discord"
Post a Comment